This post contains affiliate links. Click to see full details of my Privacy Policy.
If you’ve ever wondered if you can teach yourself how to crochet…the answer is absolutely yes, you can learn to crochet! This fun and relaxing craft can be something you can teach yourself from home and build your skills over time.
In this crochet for beginners step by step guide, we’re going to go through everything you need to know as a complete crochet beginner, from knowing what tools and materials you need, how to hold your hook and yarn, to the basic crochet stitches you need to learn to crochet in order to progress onto making crochet projects.
After completing this crochet for beginners guide, you’ll able to create beautiful crochet items such as blankets, scarves, hats, cowls and more! There a lots of free crochet patterns available here on Bella Coco Crochet.

Why should I learn to Crochet?
Crochet is a wonderful hobby which is great for relaxing and helps with improving metal health. After publishing many crochet tutorials on YouTube, I’ve had countless messages from people around the world telling me how much crochet has changed their lives.
Is Crochet difficult to learn?
I truly believe that anyone can learn how to crochet at their own pace. After following this ‘crochet for beginners’ guide, you will have learned the key elements which will lay the foundation skills in order to move onto creating your own projects.
As with most things, it takes time and practice and perseverance. I HIGHLY recommend that you feel confident with each technique before progressing to the next technique.
Where to start when learning to Crochet?
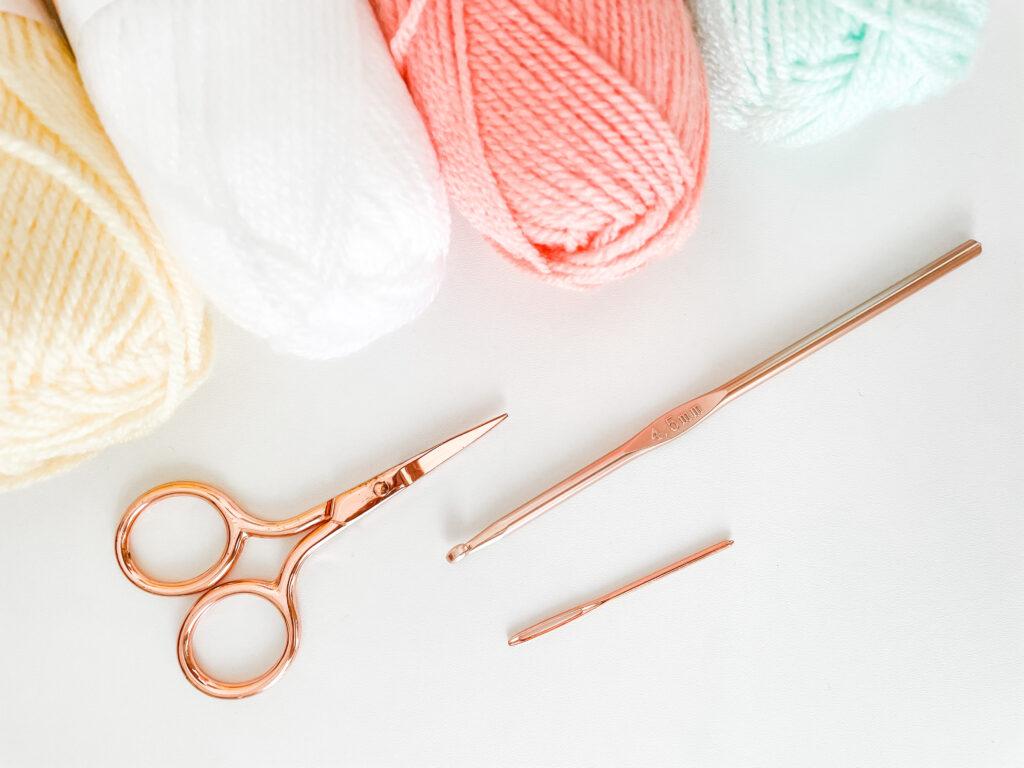
Luckily, crocheting doesn’t require a great deal of tools in order to get started. To begin, you need to have a few tools on hand:
– Yarn
– Crochet Hook
Lets look a little further into these as there are option within the two that are more suited to a beginner.
Yarn
It may be a little overwhelming when it comes to choosing a yarn at first. There are many different materials and yarn weights. Yarn materials are generally split into natural fibres such as cotton yarn, wool, alpaca, and merino and man-made fibres such as acrylic, nylon and synthetic yarn. Which you choose may come down to what type of project you are making and your own personal preference.
Weight
When it comes to the different weights in yarn, you may find a few terms being used for the same weight. I write a little bit more about this in my book ‘You Can Crochet with Bella Coco’ and it may be something you want to explore further down the line.
I would recommend a DK (Double Knit) weight yarn or an Aran weight yarn (worsted-weight yarn/medium weight yarn) to begin with. A few affordable option to get started are Stylecraft Special DK or Paintbox Simply Aran. These are all an acrylic yarn with a huge variety of colours.
Crochet Hook
There are many different crochet hook sizes to choose from. This is because you need to match a crochet hook size to the yarn weight you are using. You will need to look at your yarn label (also known as a yarn band) to see what size HOOK you will need. The instructions usually give you details for different measurements used around the world, Please watch the video here where I show you where to locate these details. You can also find a handy conversion chart here. In my demonstration, I am using a 5mm aluminium crochet hook.
Other tools needed
You will also need a pair of EMBROIDERY SCISSORS for snipping your yarn (they are sharp and better for yarn) and a DARNING NEEDLE (a large sewing needle with a wide head) for sewing in your ends. STITCH MARKERS also come in handy, however they are not essential at this point.
So to recap, you will need:
- Yarn
- Crochet Hook (or Hook Set)
- Embroidery Scissors
- Darning Needle (yarn needle)
- Stitch Markers (not essential at first)
- Measuring Tape (not essential at first but handy to have in your crochet kit!)

How to Crochet Step-by-step guide
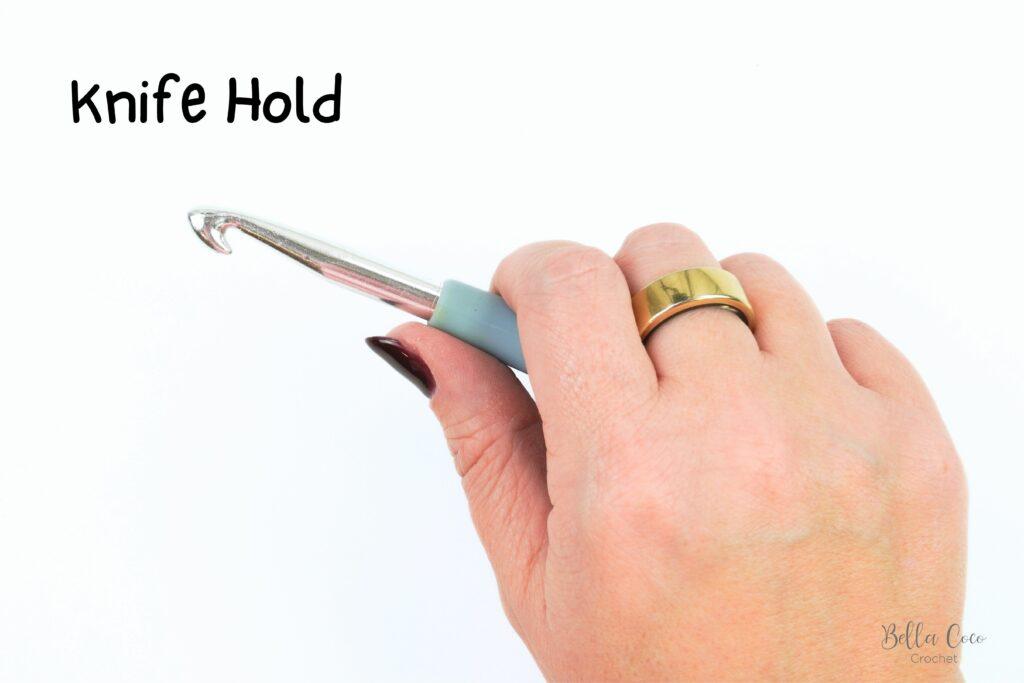
Step 1: Holding the Crochet hook
You can hold you hook in whichever way feels natural to you. I’ll be using my right hand as that’s my dominant hand, however, for you, it could be your left hand. Here are two of the most common options but I must stress that I have seen many variations of these over time. So give both ways a go and see what comes most naturally to you. You’ll be using your dominant hand to hold your hook.
Knife Hold
As the name suggests, you’ll be holding your hook like a knife with the handle of the hook in the palm of your hand and holding the hook with your index finger and thumb.
Pencil Hold
You’ll be holding your hook like a pencil, gripping with your index finger and thumb (supporting with your middle finger).
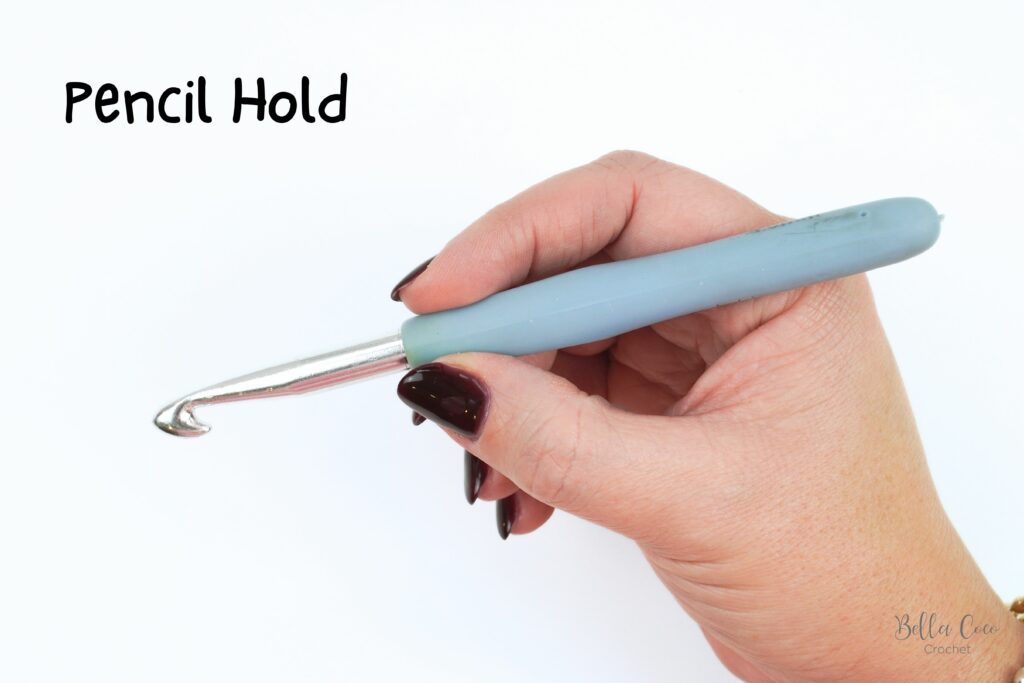
Whichever way you choose to hold your hook, you want to be mindful of your grip, gripping too tightly can cause pain in your fingers and your wrist.
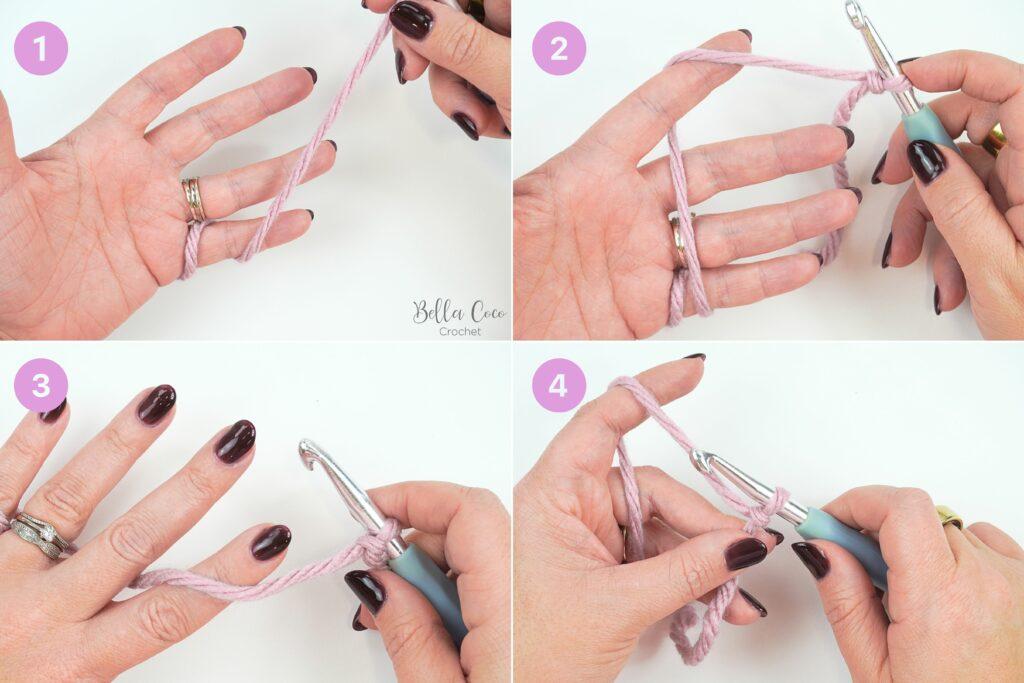
Step 2: Holding the yarn
You’ll be holding the yarn with your non-dominant hand. Again there are different ways to do this and you may find this changes for you over time. We want to ensure that you’re getting a good amount of tension on the yarn to perform our stitches. Here’s a great way to hold your yarn when you are learning to crochet.
Basic Stitches
We’re going to be covering the basics stitches which, once mastered, will help you with moving onto making crochet stitch patterns and basic crochet patterns.
First of all, we will look at making a slip knot and working chain stitches to begin the crochet swatches.
Swatches are the small pieces of fabric made from your practice pieces.
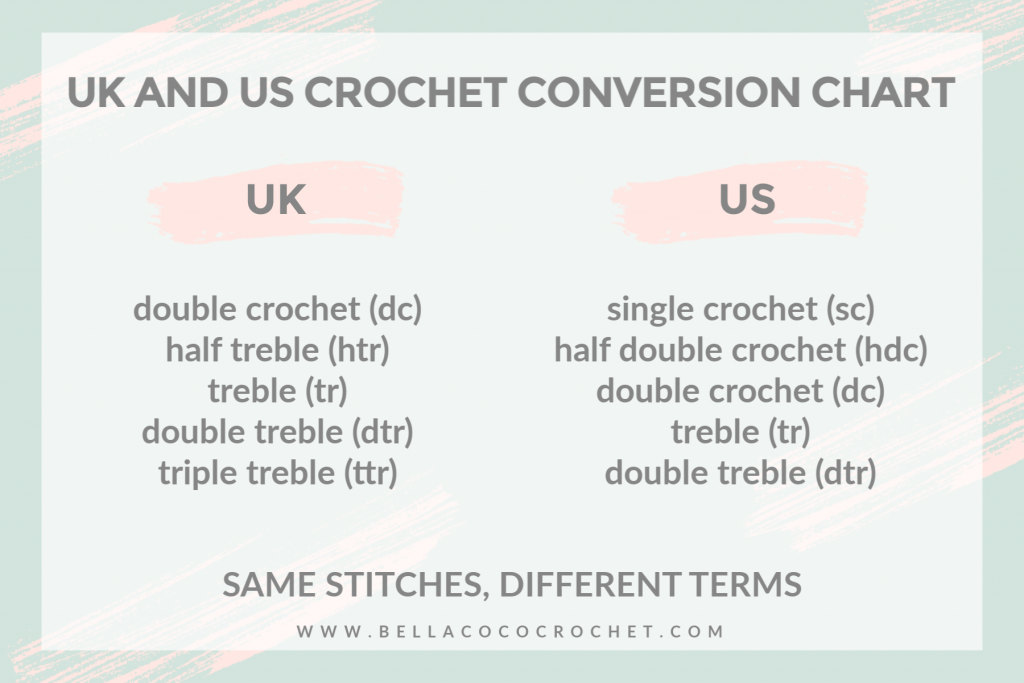
Before we move onto the ‘actual’ stitches, it’s really important to know that there are differences when it comes to UK and US stitch terminology. It’s difficult to say exactly why there are differences, but I believe that UK terminology refers to the amount of loops on the hook after the yarn has been pulled through the stitch and US terminology refers to the amount of times the hook is pulled through the loops. That’s my theory anyway!
Here’s a chart for you to see the differences in the terms. Each of the stitches are performed in the same way, they just have different names. In UK terms, there’s no such thing as a single crochet, so if you ever see that written in a pattern, you know it’s written in US terms.
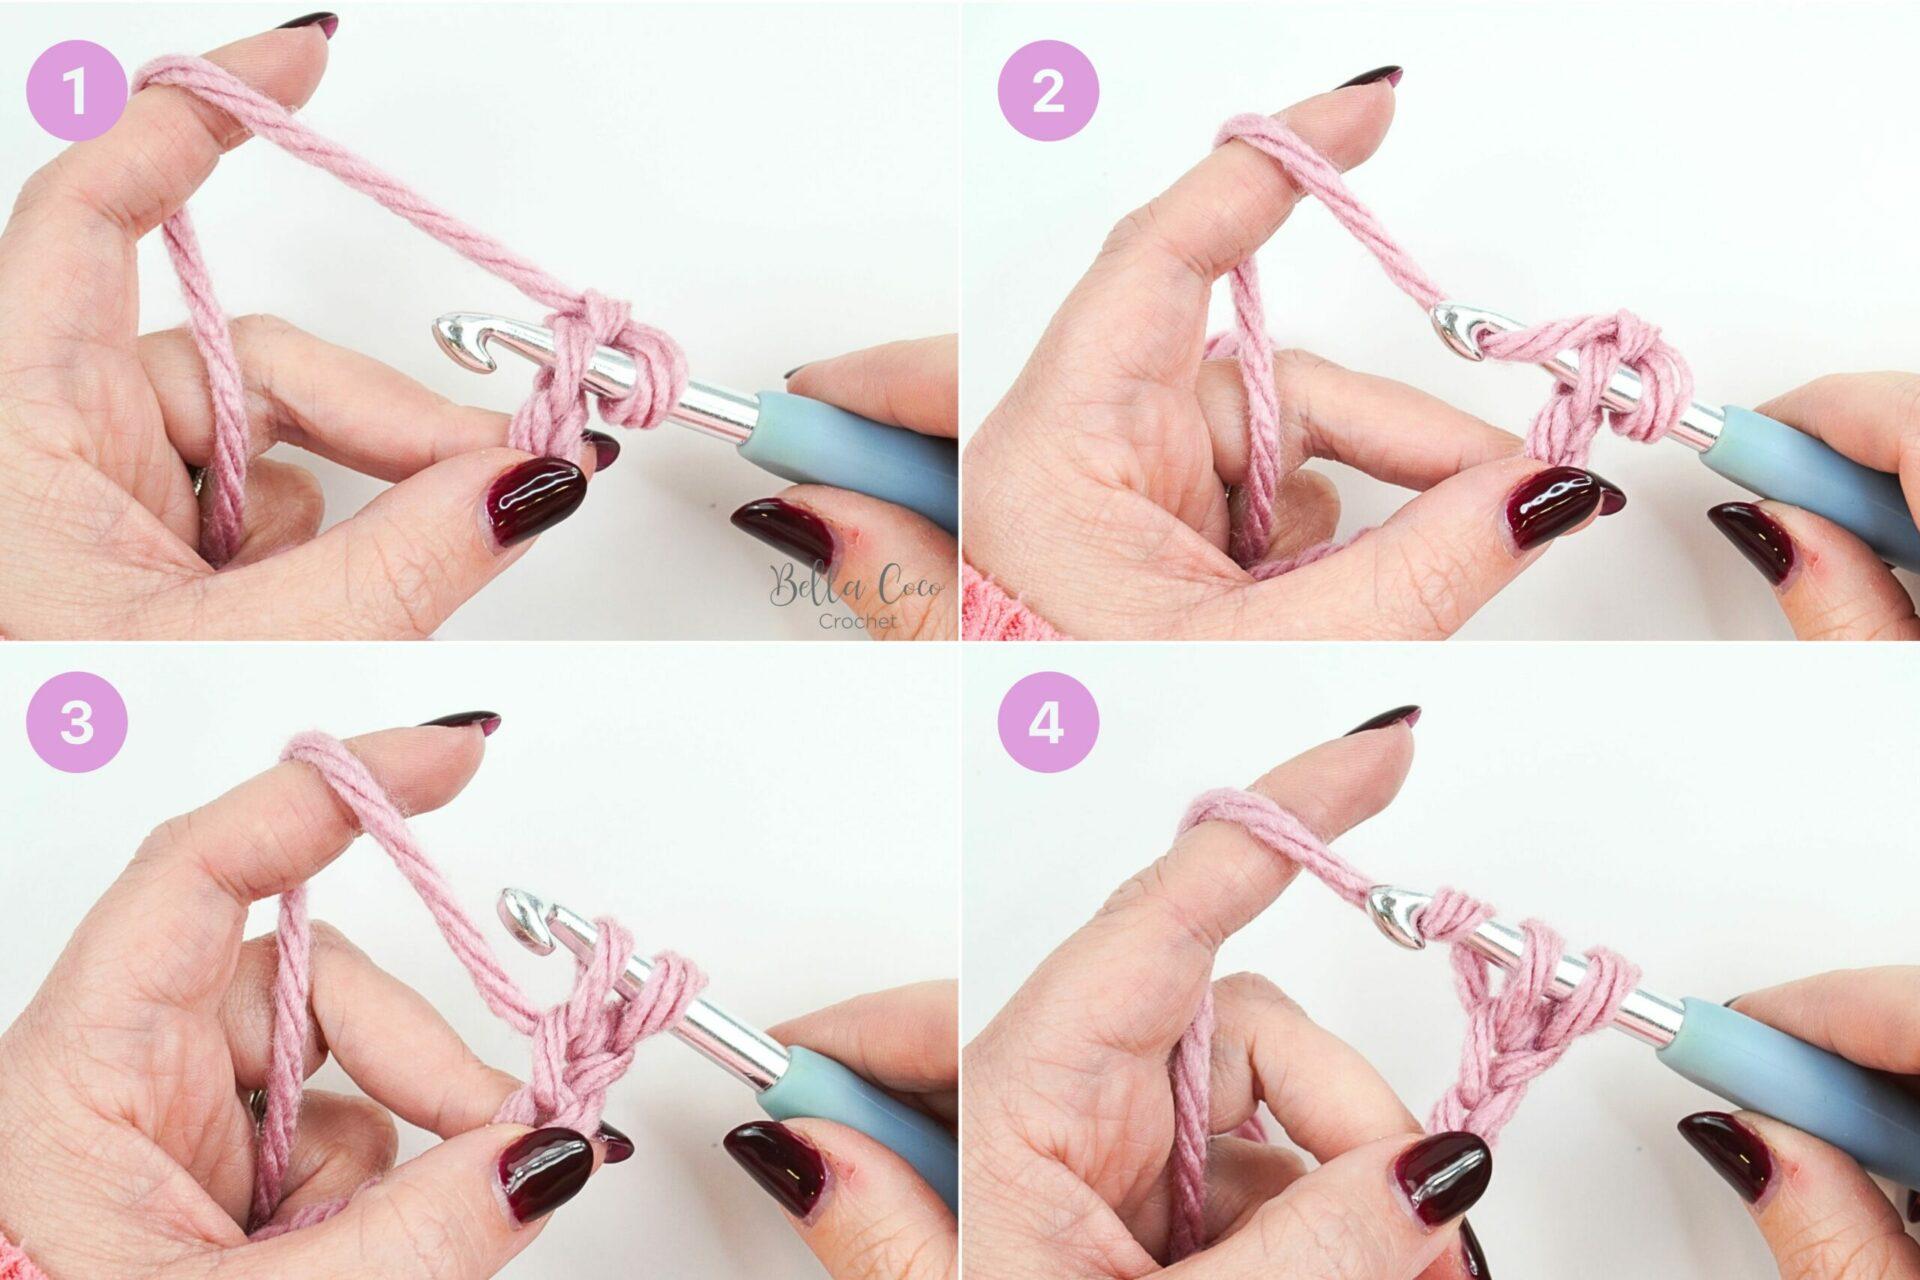
Step 3: Slip Knot
We need to begin by making a slip knot to put on our hook.
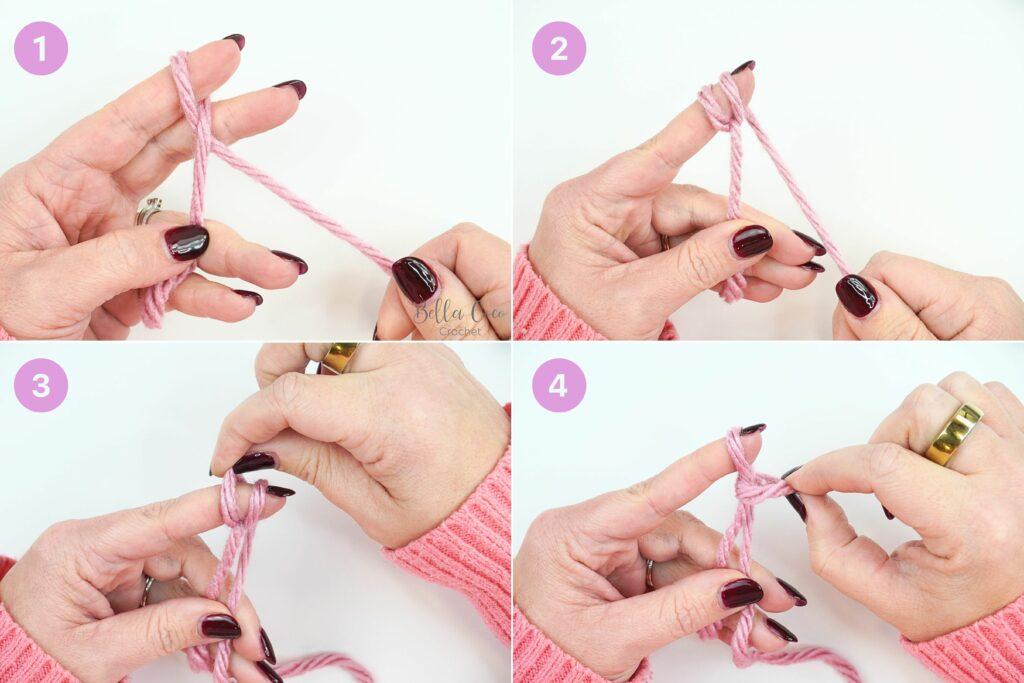
To make a slip knot:
- Wrap yarn around index finger from front to back, bringing the tail end to the front.
- Loop the working end of yarn over the finger from front to back.
- Pull the back loop over the front loop.
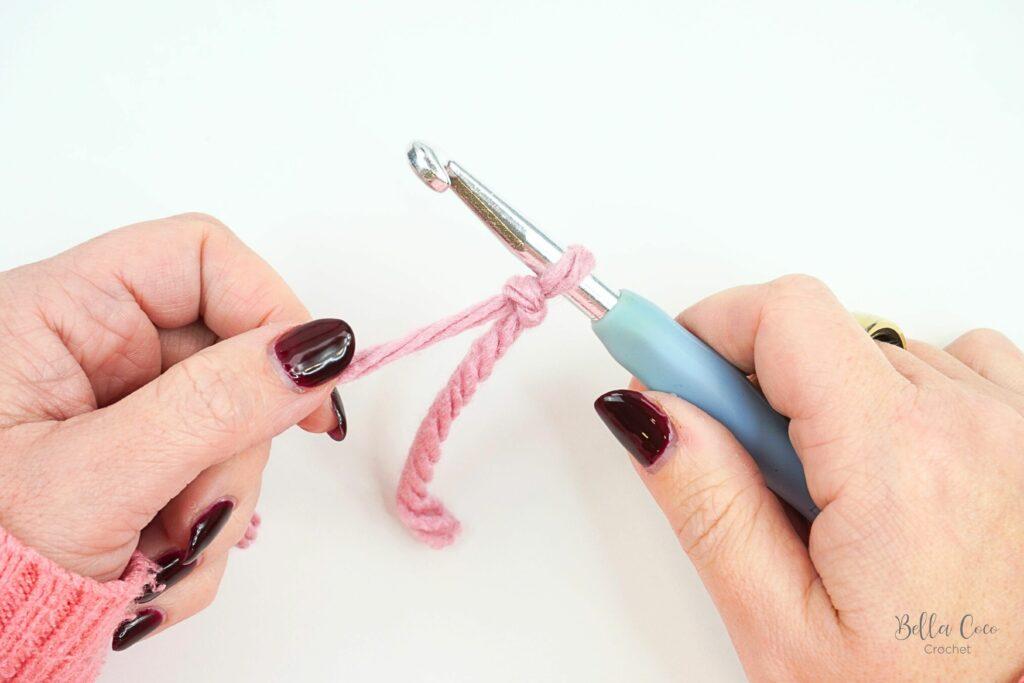
- Continue to pull the back loop off your finger. Remove remaining loop off finger and insert crochet hook.
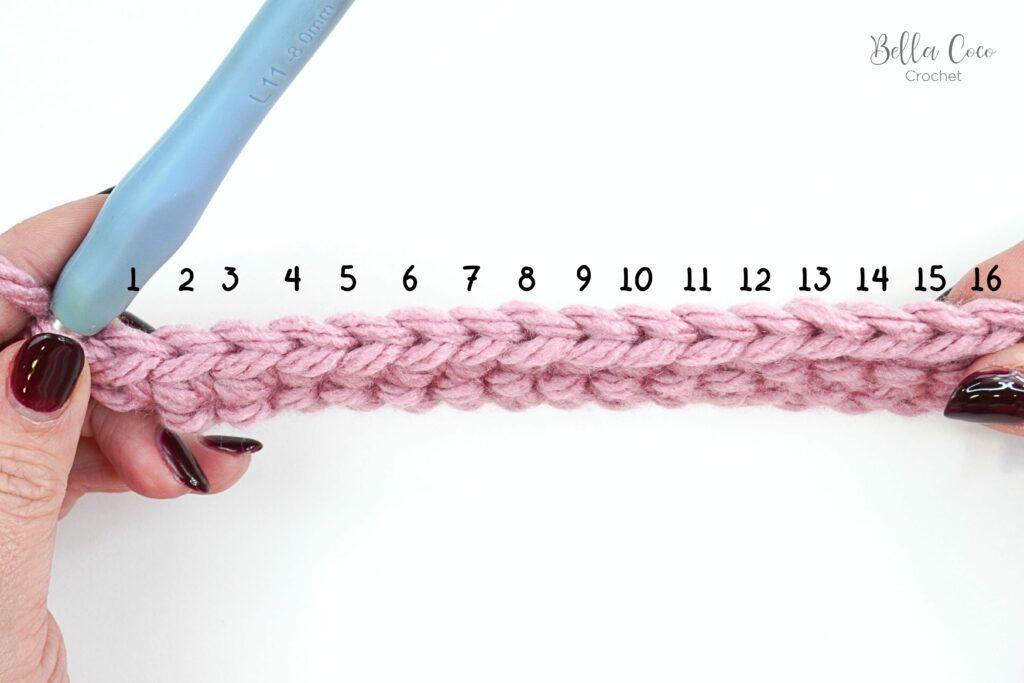
Step 4: Foundation Chain
A foundation chain forms the base of many crochet projects. This will create chains in which the following stitches will be worked into.
After you have made your slip knot, you will form you foundation chain.
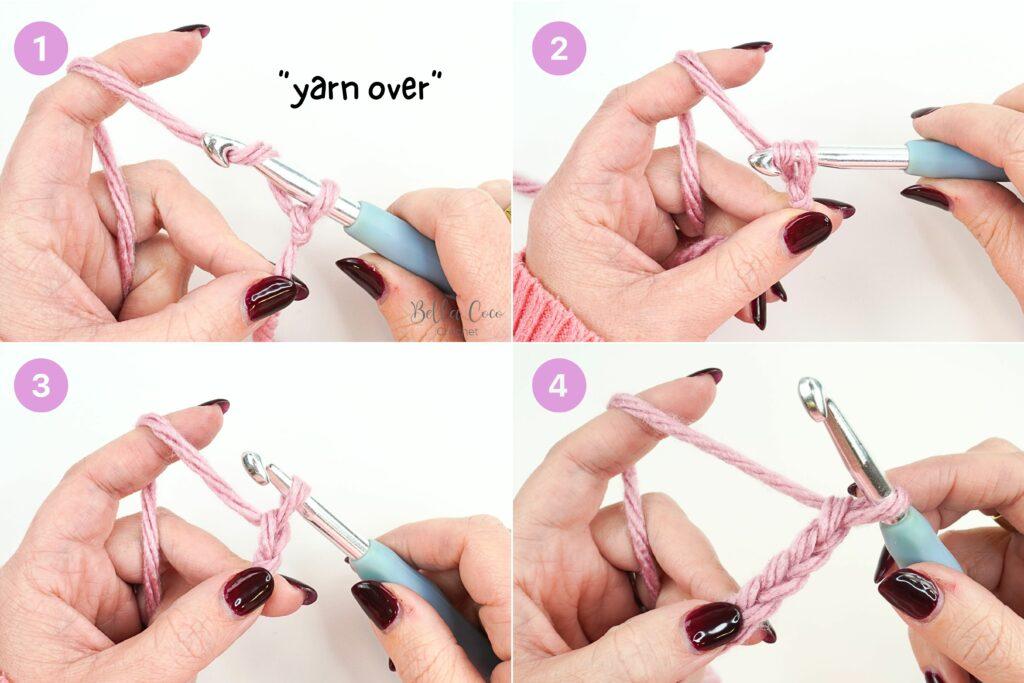
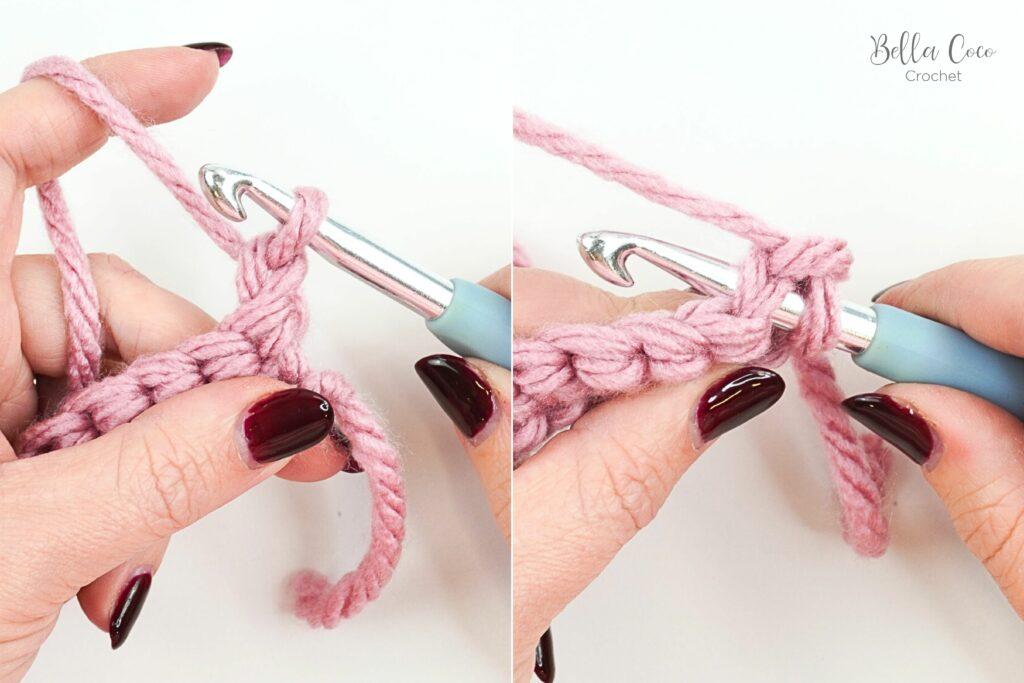
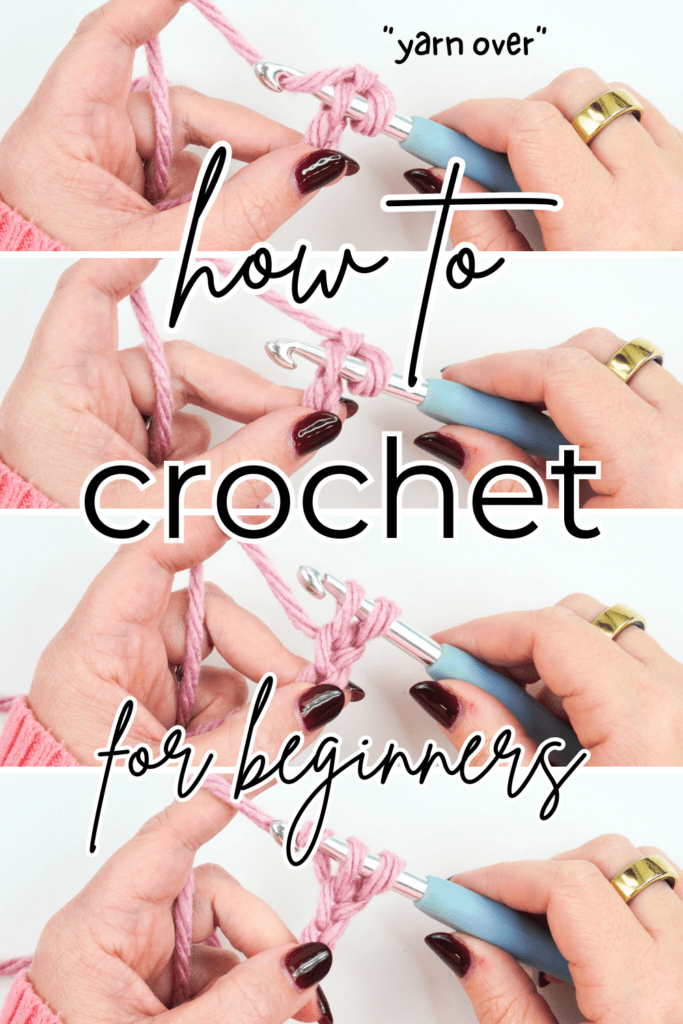
- Insert your hook into the slip knot, holding your hook and yarn as described above. Use your thumb and middle finger to hold onto the slip knot. Then, wrap the yarn around the hook from back to front, this is called a ‘yarn over’.
- Pull the yarn through the loop on your hook. You may need to rotate your hook downwards slightly in order to stop the hook catching on the loop.
- Your first chain has been made.
- Continue to yarn over and pull through the loop on the hook to make a chain.
The key here is to ensure you are not pulling too tightly on your stitches, this will make it harder to work the following row into. You can experiment by using a larger hook at first if this helps.
Now that you have your chain, let’s take a deeper look.
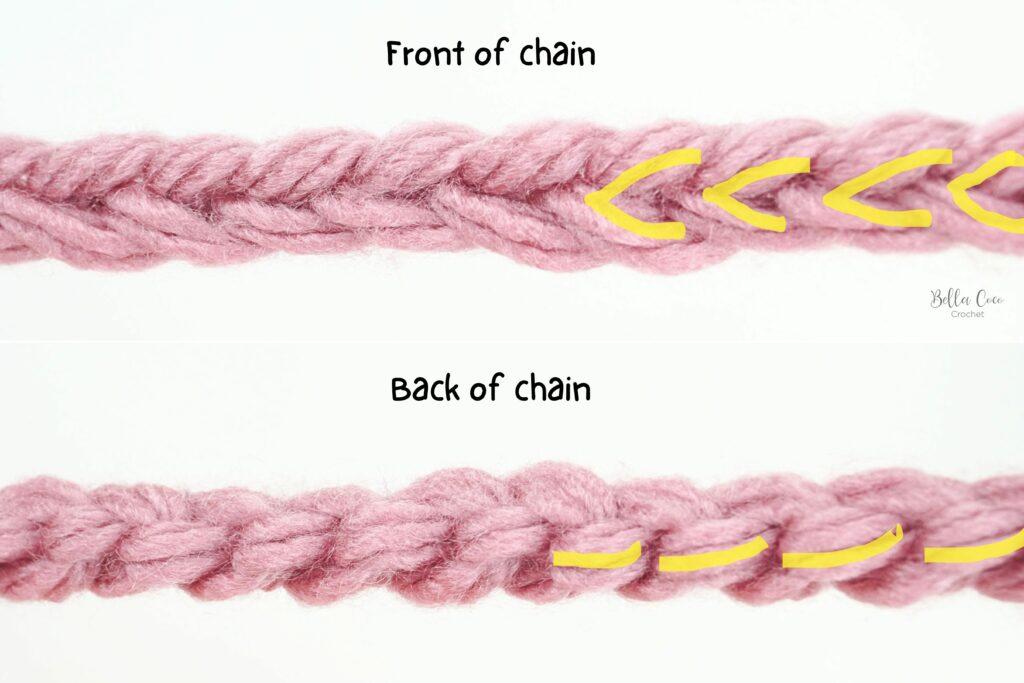
Front of the chain
When a foundation chain is made, it creates small V’s on the front of the chain. Each V is a chain and these are the spaces that will be worked into when working your stitches.
Back of the chain
Some patterns will call for you to work into the ‘back bumps’ of a chain, these are the ‘bumps’ that can be found not he back of the chain. Ultimately, this will give the work a neater finish. I would suggest you working into the v’s as above until you become a little more confident with starting a project.
With this in mind, I’ll demonstrate how to work into the front of foundation chain. Depending on what stitch you will work, will depend on which chain you will begin working in first. You will be working into the centre of each V.
Video tutorial (What you need, slip knot and chaining)
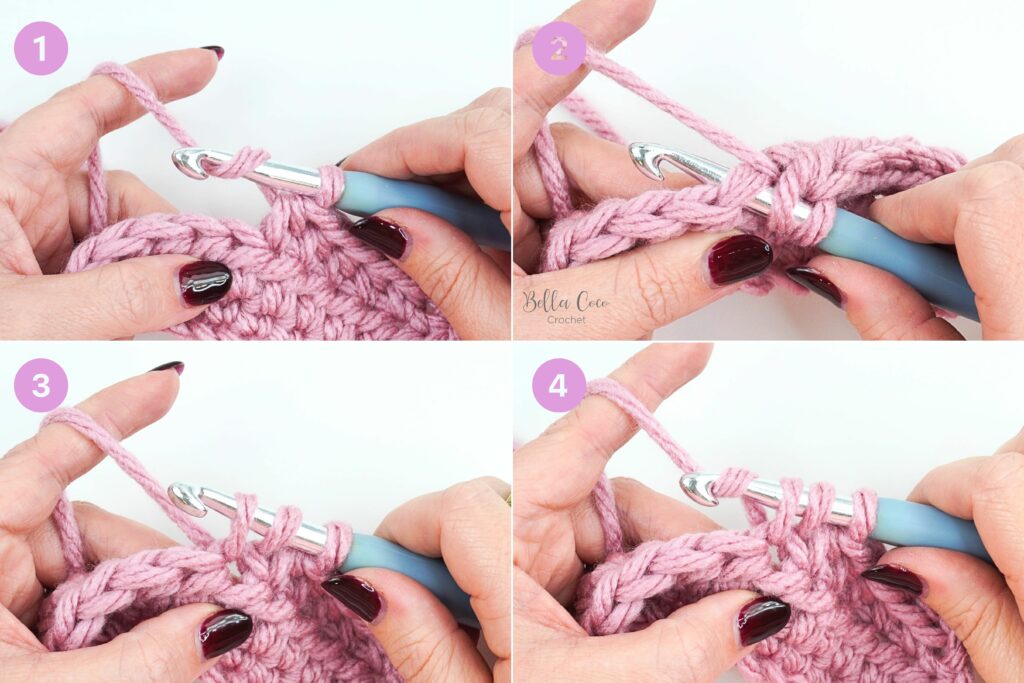
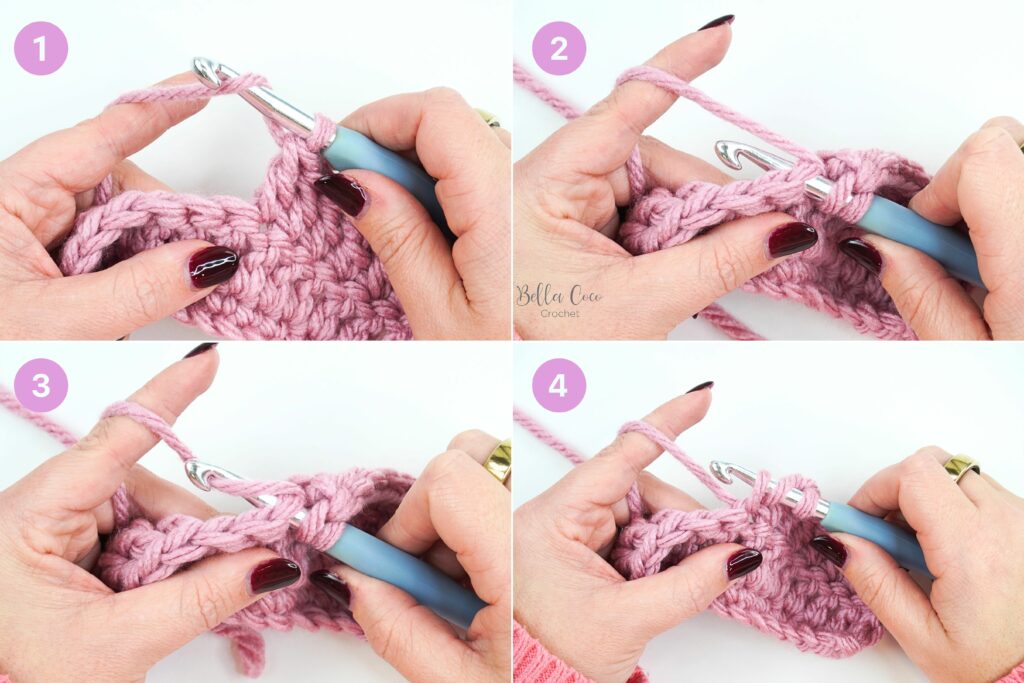
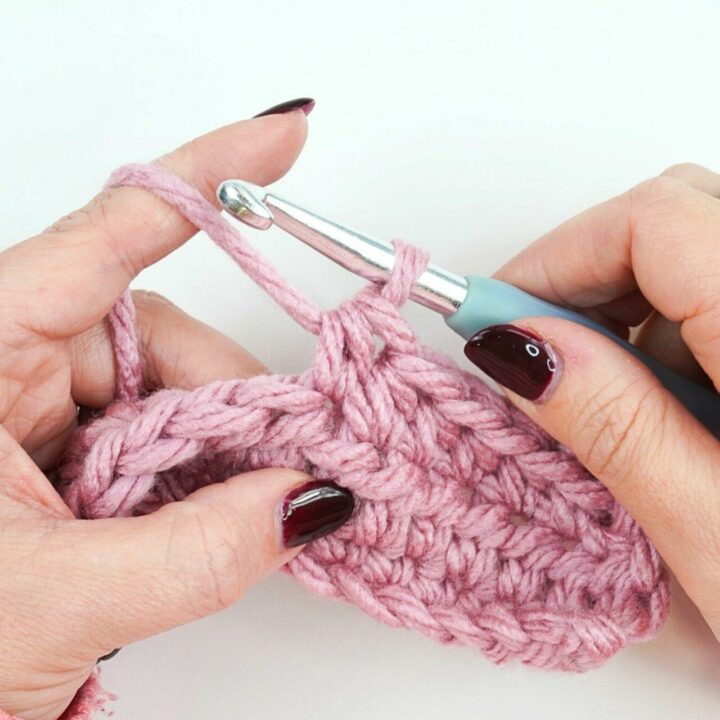
Step 5: Working your stitches
UK Double Crochet Stitch (dc) | US Single Crochet Stitch (sc)
It’s time to make some stitches. We will start with the UK double crochet/US Single crochet as this is the smallest stitch of them all. You can find a video tutorial in both right-handed and then the left-hand version here and the written step-by-step with photos below.

UK Double Crochet/US Single Crochet written instructions
- Insert your hook into the chain or stitch.
- Yarn over the hook.
- Pull through first loop on hook (you will have two loops on the hook)
- Yarn over and pull the yarn through both loops on the hook.
You can take a look at the video further down for the demonstration and a deeper look at how to correct your work, fasten off and sew in your ends. Please make sure you are using the correct video i.e left or right-handed.
Step 6: Turning your work to make rows
Once you’ve completed your first row, it’s time to turn your work in order to go back the opposite way.
If you are right handed, you’ll be turning your work like the page of a book. If your left handed it will be the opposite way.

Beginning your next row (Turning chain)
In order to work your next stitches, you need to get to the height of the stitch you are working. This will be different for each one.
When learning to crochet, I like to teach a set amount of chains for each of these stitches, however, when you get more confident, these may change in order to make your work even neater.
This turning chain may or may not count as a stitch. If you’re working from a pattern, it will indicate whether it is or not, however, as with the chains themselves I teach a set way as a starting point.
| Stitch | Turning chain | Counts as stitch? |
| UK Double Crochet / US Single Crochet | Chain one | No |
| UK Half Treble Crochet / US Half Double Crochet | Chain two | Yes |
| UK Treble Crochet / US Double Crochet | Chain three | Yes |
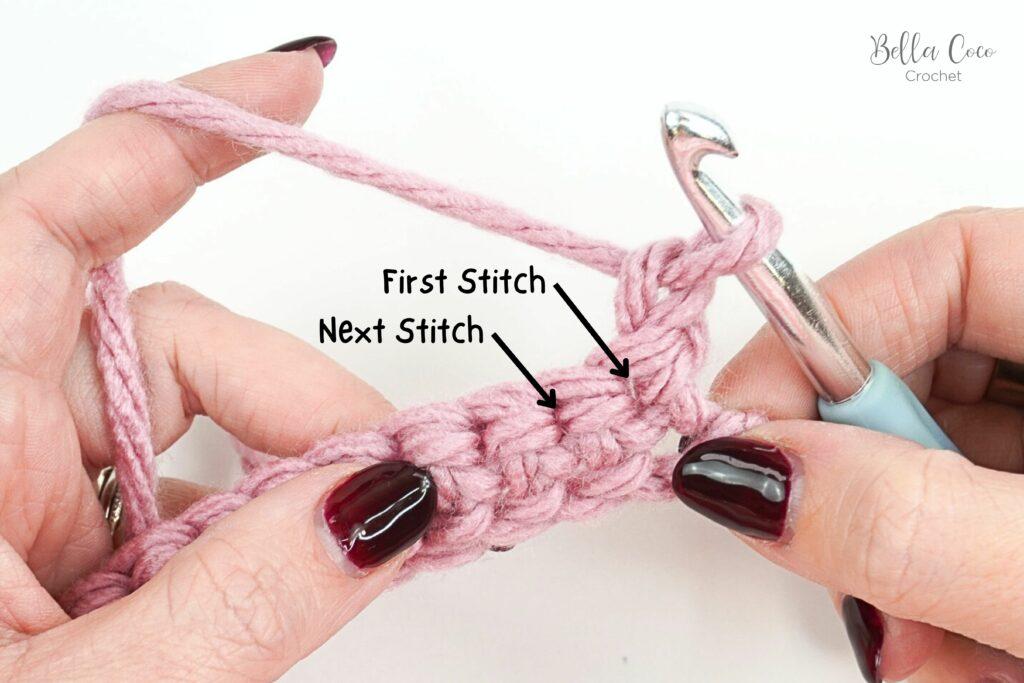
Where to place your first stitch
Let’s look at where you’re going to place your first stitch. As mentioned in the above section, your turning chain may, or may not count as a stitch. Here’s where you can work in each situation.
If the turning chain does not count as a stitch, you will place your first stitch in the ‘first stitch’. If it does count as a stitch, you will place your first stitch in the ‘next stitch’.
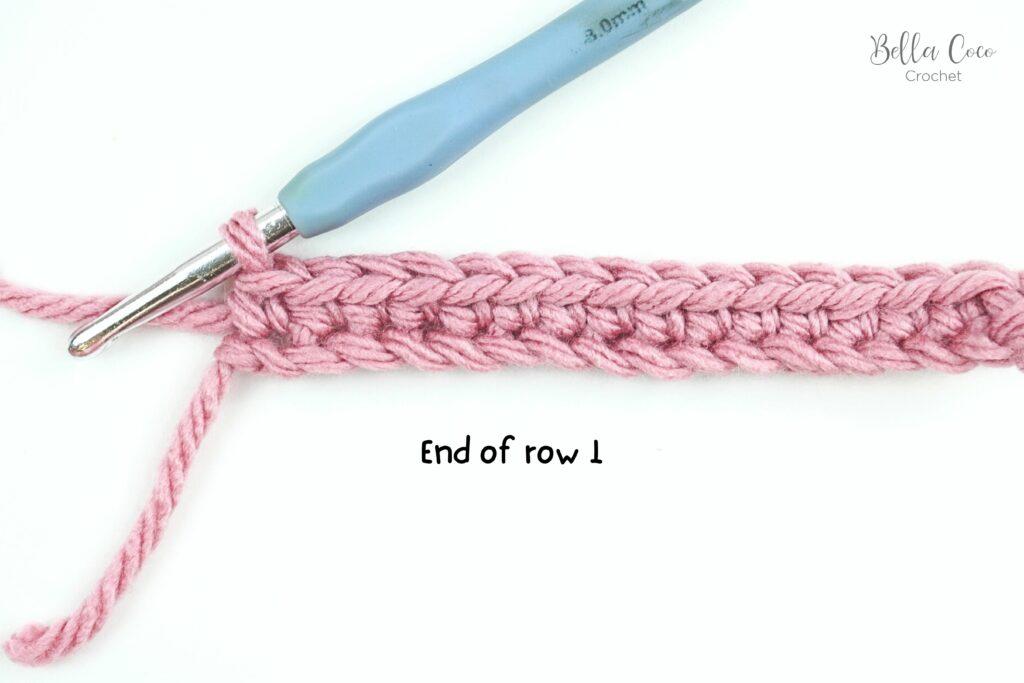
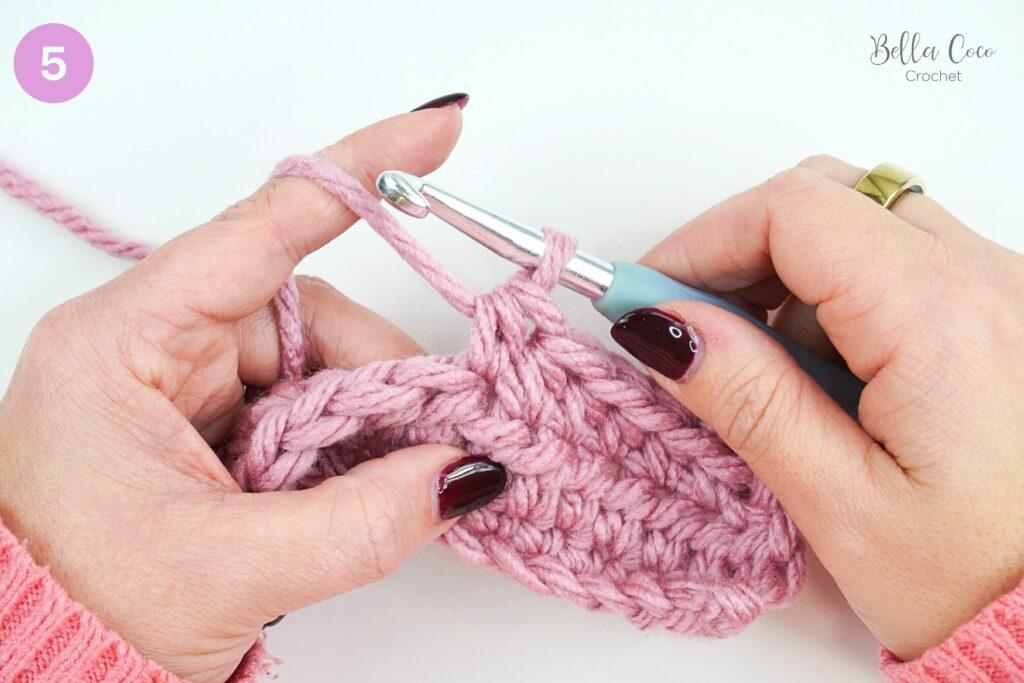
Step 7: Working row 2
Continue across this row working one UK Double Crochet (US Single Crochet) in each stitch. You will be starting in the first stitch.
Counting your stitches
Once you’re at the end of your row, it’s a good idea to count your stitches to ensure you have the same amount as row 1. You can do this by tilting your work towards you and finding the V’s.
Building your work
You can now continue to build your rows as in row 2 until you reach your desired height. You can then cut your yarn and secure (known as fasten off)
Step 8: How to fasten off
We can now go ahead and finish off your swatch, this is know as fastening off.
- Chain 1.
- Snip your yarn leaving a good tail end (this will help when sewing in your end).
- Pull yarn through loop and remove hook.
- Pull tight to secure.
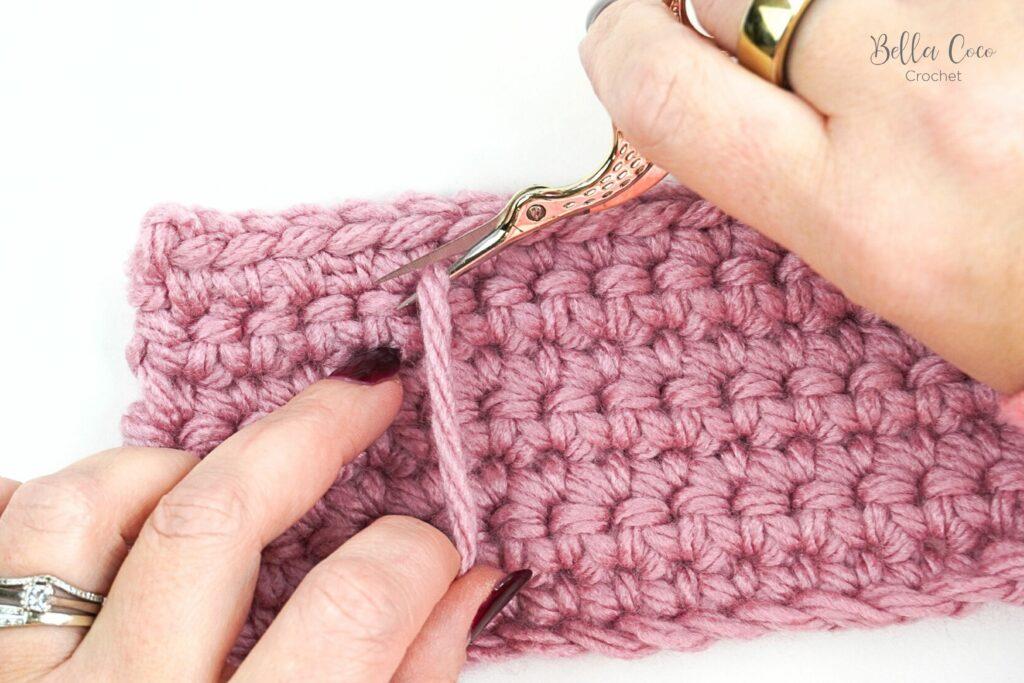
Step 9: Sew in ends
The final step is to sew in a tail ends (or loose ends as some may call it). I like to use my ‘rule of 3’ method. This means were going to work back, forth and back again to ensure the tail end is full secure.
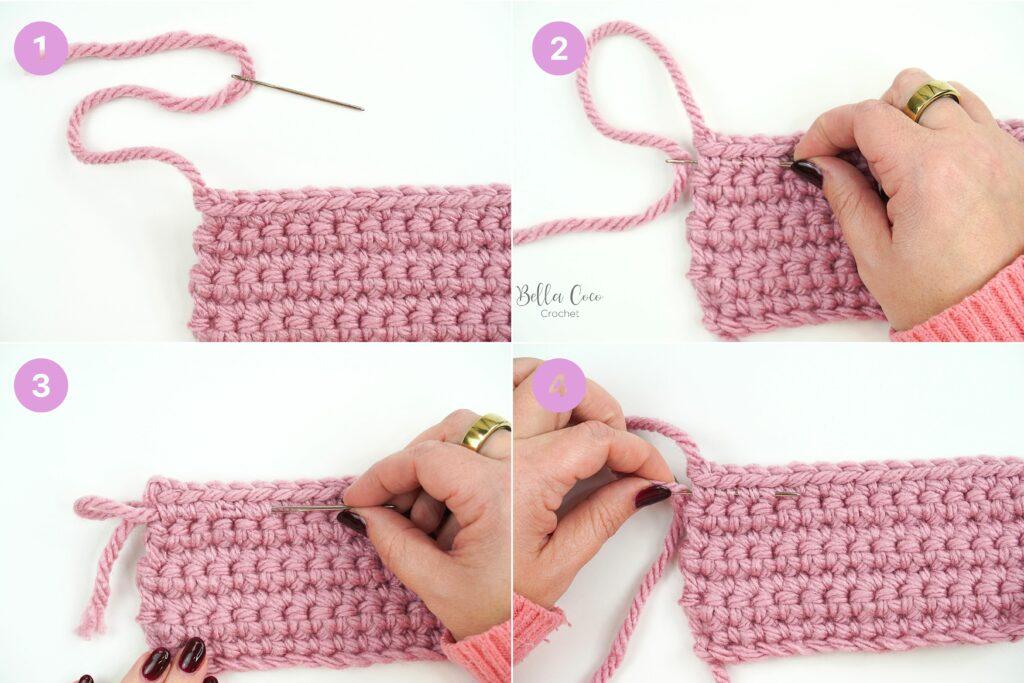
- Thread up darning needle.
- Weave needle in and out of stitches/fibres in one direction around 2-3 inches.
- Weave back the opposite way catching different fibres.
- Weave back once more catching different fibres.
- Snip the remaining yarn.
Video tutorial (UK Double Crochet, US Single Crochet)
More Stitches
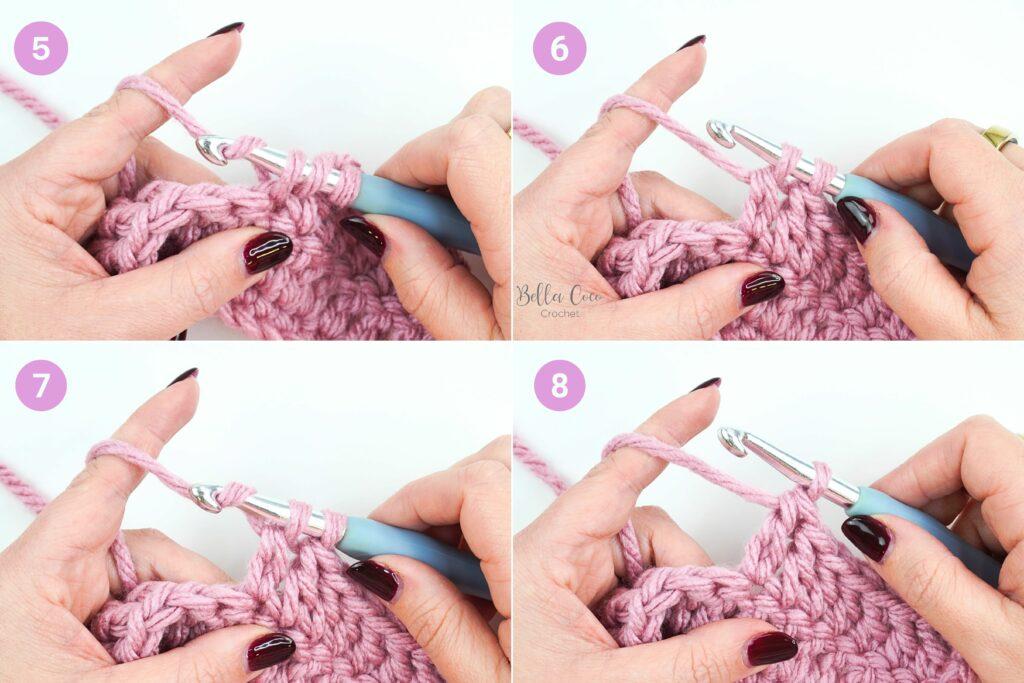
UK Half Treble Crochet Stitch (htr) | US Half Double Crochet Stitch (hdc)
- Yarn over hook.
- Insert your hook into the chain or stitch.
- Yarn over and pull through stitch (you will have three loops on the hook).
- Yarn over and pull through all three loops on the hook.
- Stitch completed.
Video tutorial (UK Half treble Crochet / US Hand Double Crochet)
Take a look at the videos below for the demonstration. Please make sure you are using the correct video i.e left or right handed.
UK Treble Crochet Stitch (tr) | US Double Crochet Stitch (dc)
- Yarn over hook.
- Insert your hook into the chain or stitch.
- Yarn over hook.
- Pull through stitch (you will have three loops on the hook)
- Yarn over hook.
- Pull through two loops (you will have two loops on your hook)
- Yarn over hook.
- Pull the yarn through both of the remaining loops on the hook.
Video tutorial (UK Treble Crochet / US Double Crochet)
Take a look at the videos below for the demonstration. Please make sure you are using the correct video i.e left or right handed.
UK Double Treble Crochet Stitch (dtr) | US Treble Crochet Stitch (tr)
- Yarn over TWICE and insert your hook into the chain or stitch.
- Yarn over and pull through stitch (you will have four loops on the hook)
- Yarn over and pull through two loops on the hook (you will have three loops on the hook)
- Yarn over and pull through two loops on the hook (you will have two loops on the hook)
- Yarn over and pull through the remaining two loops on the hook.
Take a look at the videos below for the demonstration. Please make sure you are using the correct video i.e left or right handed.
UK Slip Stitch (ss) | US Slip Stitch (sl st)
- Insert your hook into the chain or stitch.
- Yarn over and pull through stitch and loop on the hook.
Ready for more techniques?
Here’s some more beginner crochet tutorials that you may find useful!
Ready for some stitch combinations?
Ate you ready for some more complex stitch patterns?
Explore more in our Stitch library
Ready for a project?
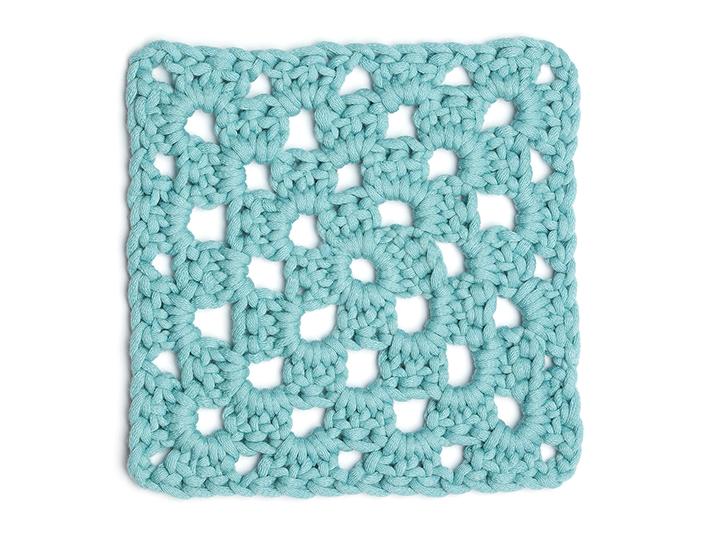
Why not try a classic granny square? Or if you’re feeling a little more adventurous, you could try the Crochet Heart Coaster! Granny squares are great for making a multiple of projects by doing them together, there are some great joining methods available such as the Slip Stitch Join or something a little bit more decorative like the Zig Zag Slip Stitch join.
Now what?
Make sure you join us in our Facebook Group where you can get help and advice from other crocheters.
Subscribe to my YouTube channel to stay up to day with my latest tutorials and tag me on Instagram @bellacococrochet so I can see your progress!
How to crochet for beginners
Learn how to crochet step by step with this complete guide to crochet.
Materials
- - Yarn
- - Hook
Tools
- - Scissors
- - Darning needle
Instructions
1. Create a slip knot
2. Hold you hook in your dominant hand and your yarn with your non dominant hand
3. Begin by chaining 11 (yarn over and pull though loop)
4. Row 1: Dc in the second ch from hook (missed ch does not count as a stitch) and dc across. You will have 10 stitches. Turn your work.
5. Chain 1 (does not count as a stitch)
6. Dc in first stitch and each stitch across
7. Repeat steps 5 & 6 until you get to your desired size.
8. Fasten off yarn and sew in ends.
Notes
You can find full step by step instructions including photos and videos in the post above.


 Skip to Instructions
19 Comments
Vanessa Dixon
February 24, 2019 at 9:47 amLooking forward to this
Cheryl
February 24, 2019 at 3:27 pmIm going to share this with my neighbors gr child shes about 6 and wants to learn im afraid i cant teach her since i crochet backwards i was taught by a leftie
Gail Tait
February 26, 2019 at 12:02 pmHave always wanted to crochet but never knew where to start, these videos are brilliant. Thank you.
Bella Coco Crochet
February 27, 2019 at 2:01 pmThank you glad they have helped you.
Jennie Morgan
March 3, 2019 at 11:49 amLoving these and have shared them onto our needlework for wellbeing group ! Thankyou x
BellaCocoTeam
March 5, 2019 at 3:07 pmThank you 🙂
Susie
March 30, 2019 at 6:09 amThanks for your help, easy to understand
BellaCocoTeam
March 30, 2019 at 3:07 pmYou’re very welcome 🙂
Nasira Shammi
July 5, 2020 at 5:09 amHi,I am absolutely a new beginner for crochet but I think I will learn the crochet within a few days. Actually I just saw the videos for curicity and determined I must learn the crochet.
Thanks a lot for giving the videos for the new beginner. ❤
BellaCocoTeam
July 5, 2020 at 1:30 pmYou’re very welcome and good luck 🙂
Rebecca
July 16, 2020 at 2:12 pmI am really enjoying your videos and they have helped me as I learn to crochet.
I do have a question though (or two) one is when you are making your initial chain
of say…15 do you make one extra for when you are turning and going back the other way?
Also..I am having difficulties keeping my edges straight, they don’t look nice and square like yours do and so I try to stitch to the very last…dimple/divet (whatever), would using a stitch marker help to mark off the last corner to make my stitch be a good idea?
Lastly, I am having a real bugger of a time trying to keep my tension constant. I figured out that I simply need to hold the yarn below the needle and not really pull on it…much but the tension for yarning over is a bit trickier, what do you suggest I can do to keep the tension constant without creating sloppy stitches?
At any rate, I have seen many videos but yours are nice and detailed without being too complex.
Thank you for creating these videos, they really helped me out tremendously.
BellaCocoTeam
July 16, 2020 at 5:50 pmI’m glad you like my videos and that you’ve found them helpful When you are following a crochet pattern the starting chain will normally be worked in multiples plus extra chains ready for turning. For example, you might need to make a chain in multiples of five, plus an extra three chains at the end so that when you make your first stitch into the fourth chain, you are working at the correct height. Hope this makes sense! I think it’s always a good idea to use stitch markers to mark out stitches when you first start out. In particular, lots of people miss out the chain stitches at the end of the row so make sure you are working into this stitch if the pattern requires it. Lastly, tension is one of those things that you will find gets better with practise. I do have a video tutorial here: https://www.youtube.com/watch?v=SRVA_4uNsNw&t=1s which may help you in the meantime 🙂
Rebecca
July 16, 2020 at 8:04 pmThanks for the video however I am still a bit perplexed.
Now, for example I made a chain of twenty stitches and now I want to start doing a single crochet, before I start that, am I correct in assuming that I should add at least two more stitches regardless of the type of stitching I use?
ALSO..what sort of font do you use on your site as some of the letters looks a tad odd (only slightly).
Thank you for being so helpful and nice. 🙂
Adya
August 12, 2022 at 10:07 pmHi, I have the same question, do we always add 2 stitches?
Thank you for the videos, very simple to follow along for beginners! Looking forward to continuing this journey 🙂
BellaCocoTeam
August 15, 2022 at 6:21 pmH Adya You’re welcome, I’m so happy to hear I’m helping you along your crochet journey We add two stitches to bring us up to the correct height ready to make the first stitch (whether in the starting chain or at the beginning of a row). The number of chains will differ according to the stitch you’re going to make – you’ll chain an extra one for a double crochet, for example.
Lindi Warren
February 20, 2024 at 8:19 pmI stumbled across Bella Coco in Jan 2023 when I was given a crochet hook and yarn and told to crochet by a friend. Sarah-Jayne’s videos taught me everything I needed to know to get started and learn how to crochet. What I really like is that she covers both UK and US terms, which helps so much in reading patterns. Because of her videos I have been able to try out so many different stitches and I am currently working thru her patchwork blanket and learning even more stitches.
Thank you for making learning to crochet so easy.
Sally Green
February 21, 2024 at 12:05 pmThanks to Bella Coco I have been able to fulfill a lifelong dream of learning to crochet.
Debbie
February 21, 2024 at 5:57 pmI came back to crochet in 2019 after learning the basics as a teenager (1970s) and found bella coco’s youtube videos immensely helpful. Initially I wasn’t at all confident following written patterns so would watch and learn. These days I can follow written patterns and help others learn to crochet, always suggesting they look at BC’s channel. This guide is great too, but the videos are brilliant and left handed versions so helpful.
Tracey
February 21, 2024 at 6:42 pmI love Bella Coco video’s, I learnt to crochet with them about 7 years ago and I couldn’t have learnt without her help. Sarah Jayne I’d so good at explaining the stitches and takes her time going through each one. Whenever anyone asks me how I learnt or if they want to learn I always point them to Bella Coco ❤